
This guide will walk you through creating a React Native app using the Expo framework and setting it up with MagicBell. At the end of this guide, you will have an app that receives notifications via push and shows them in a notification inbox. Integrating push notifications within mobile apps is crucial as it enhances communication and user interaction, providing a cost-effective alternative to SMS messages.
We’ll gloss over a few details to get you to your goal as quickly as possible but aim to provide guides for those in the future. For brevity, this guide will focus on demonstrating how to set up an iOS application with APNs and will skip over Android and FCM setup in some places. Before registering to receive push notifications, it is essential to obtain the user's permission for notification permissions to use the notifications API effectively.
Introduction to Push Notifications
Push notifications are a powerful way for application publishers to engage users directly. They bypass spam filters and are frequently used to drive actions. Push notifications can be used on most mobile platforms and at any time. In the context of React Native apps, push notifications are a crucial feature that allows users to receive notifications even when the app is not running.
To enable push notifications in a React Native app, you need to use a library such as OneSignal or Firebase Cloud Messaging. For detailed instructions on integrating Firebase Cloud Messaging with Expo for React Native web and mobile apps, check out our comprehensive guide. These libraries provide robust solutions for sending and receiving notifications. React Native also provides a built-in module for handling push notifications, which can be used to send and receive notifications seamlessly. By integrating push notifications, you can significantly enhance user engagement and ensure that important updates reach your users promptly.
Prerequisites
At this point, we assume you have set up a MagicBell project and have access to its API Key and Secret. The guide also uses the MagicBell CLI to send broadcasts from the command line. It will come in handy during testing, so make sure to install it.
Furthermore, you should know how React Native apps are built. You should have a recent Xcode and Node.js environment setup. This guide will use NPM, but you should be able to follow along with Yarn or any other package manager you choose. You'll also need a working Ruby environment with CocoaPods installed. We will use the Expo framework to reduce the boilerplate and make future upgrades easy for us.
You will need accounts for both APNs and Google's Firebase Cloud Messaging to work with them.
Getting Started
We’ll start by creating a plain new React Native app with Expo (SDK 52 at the time of writing) by executing the following commands in your terminal:
- npx create-expo-app@latest MagicBellInbox
- cd MagicBellInbox
- npm run ios
It is crucial to set up and start the development server to test the application effectively. The development server facilitates communication between the mobile app and the backend, which is essential for implementing push notifications.
At this point you should see our new app running in your iOS Simulator, greeting you with a “Welcome! 👋” and a two tab navigation.

Adding the MagicBell Inbox
Installing packages
We'll start by adding the MagicBell React SDK and its dependencies:
npm add @magicbell/react-headless react-native-sse react-native-url-polyfill
Next, add the polyfills early on in your application's lifetime:
- Add an index.js file at your project root:
// Polyfills required by @magicbell/react-headless
import EventSource from 'react-native-sse';
import 'react-native-url-polyfill/auto';
global.EventSource = EventSource;

import 'expo-router/entry';
- Update the project entry point in package.json to “main”: “./index”
Additionally, you need to import constants from expo-constants to obtain configuration values such as the project ID necessary for enabling notifications.
Setting up MagicBell
MagicBell is configured via the MagicBellProvider component. A good place to add it is close to the root of your navigation tree. In this example that is inside the RootLayout component in app/_layout.tsx:
return (
  <MagicBellProvider apiKey="[API-KEY]" userEmail="[USER-EMAIL]">
    <ThemeProvider value={colorScheme === 'dark' ? DarkTheme : DefaultTheme}>
      <Stack>
        <Stack.Screen name="(tabs)" options={{ headerShown: false }} />
        <Stack.Screen name="+not-found" />
      </Stack>
      <StatusBar style="auto" />
    </ThemeProvider>
  </MagicBellProvider>
);
Make sure to update [API-KEY] and [USER-EMAIL] with your project information. Authenticating with different users is beyond the scope of this guide and is left as an exercise for the reader.
Adding a Notification Inbox UI
The @magicbell/react-headless package does not provide any UI components for rendering a Notification Inbox. For web projects that are using react-dom, we offer a full-fledged Notification Inbox via @magicbell/react. In this guide, we’ll build an Inbox from scratch, using plain react-native components from the Expo starter template.
Let’s start by adding a new tab to our app:
- Add a bell icon to components/ui/IconSymbol.tsx by updating MAPPING and adding ‘bell.fill’: ‘notifications‘.
- Now you can add the tab in app/(tabs)/_layout.tsx:
<Tabs.Screen
  name="notifications"
  options={{
    title: 'Notifications',
    tabBarIcon: ({ color }) => <IconSymbol size={28} name="bell.fill" color={color} />,
  }}
/>
- The code for our notification screen will live in a new file app/(tabs)/notifications.tsx:
import { ThemedText } from '@/components/ThemedText';
import { ThemedView } from '@/components/ThemedView';
import { ScrollView, StyleSheet, SafeAreaView } from 'react-native';
import { useNotifications, IRemoteNotification } from '@magicbell/react-headless';

function Notification({ data }: { data: IRemoteNotification }) {
  return (
    <ThemedView>
      <ThemedText type="defaultSemiBold">{data.title}</ThemedText>
      <ThemedText>{data.content}</ThemedText>
    </ThemedView>
  );
}

export default function NotificationsScreen() {
  const notificationStore = useNotifications();

  return (
    <ThemedView style={styles.content}>
      <ScrollView>
        <SafeAreaView style={styles.container}>
          <ThemedView style={styles.content}>
            <ThemedText type="title">Notifications</ThemedText>
            {notificationStore?.notifications.map((notification) => (
              <Notification key={notification.id} data={notification} />
            ))}
          </ThemedView>
        </SafeAreaView>
      </ScrollView>
    </ThemedView>
  );
}

const styles = StyleSheet.create({
  container: {
    flex: 1,
  },
  content: {
    flex: 1,
    padding: 16,
    gap: 16,
    overflow: 'hidden',
  },
});
Now all you need is some notifications to show. You can create them from your command line using the MagicBell CLI:
- magicbell login
- magicbell broadcasts create –recipients [USER-EMAIL] –title “Notifications for everybody” –content “This call could have been a notification” (Don’t forget to insert your user’s email)
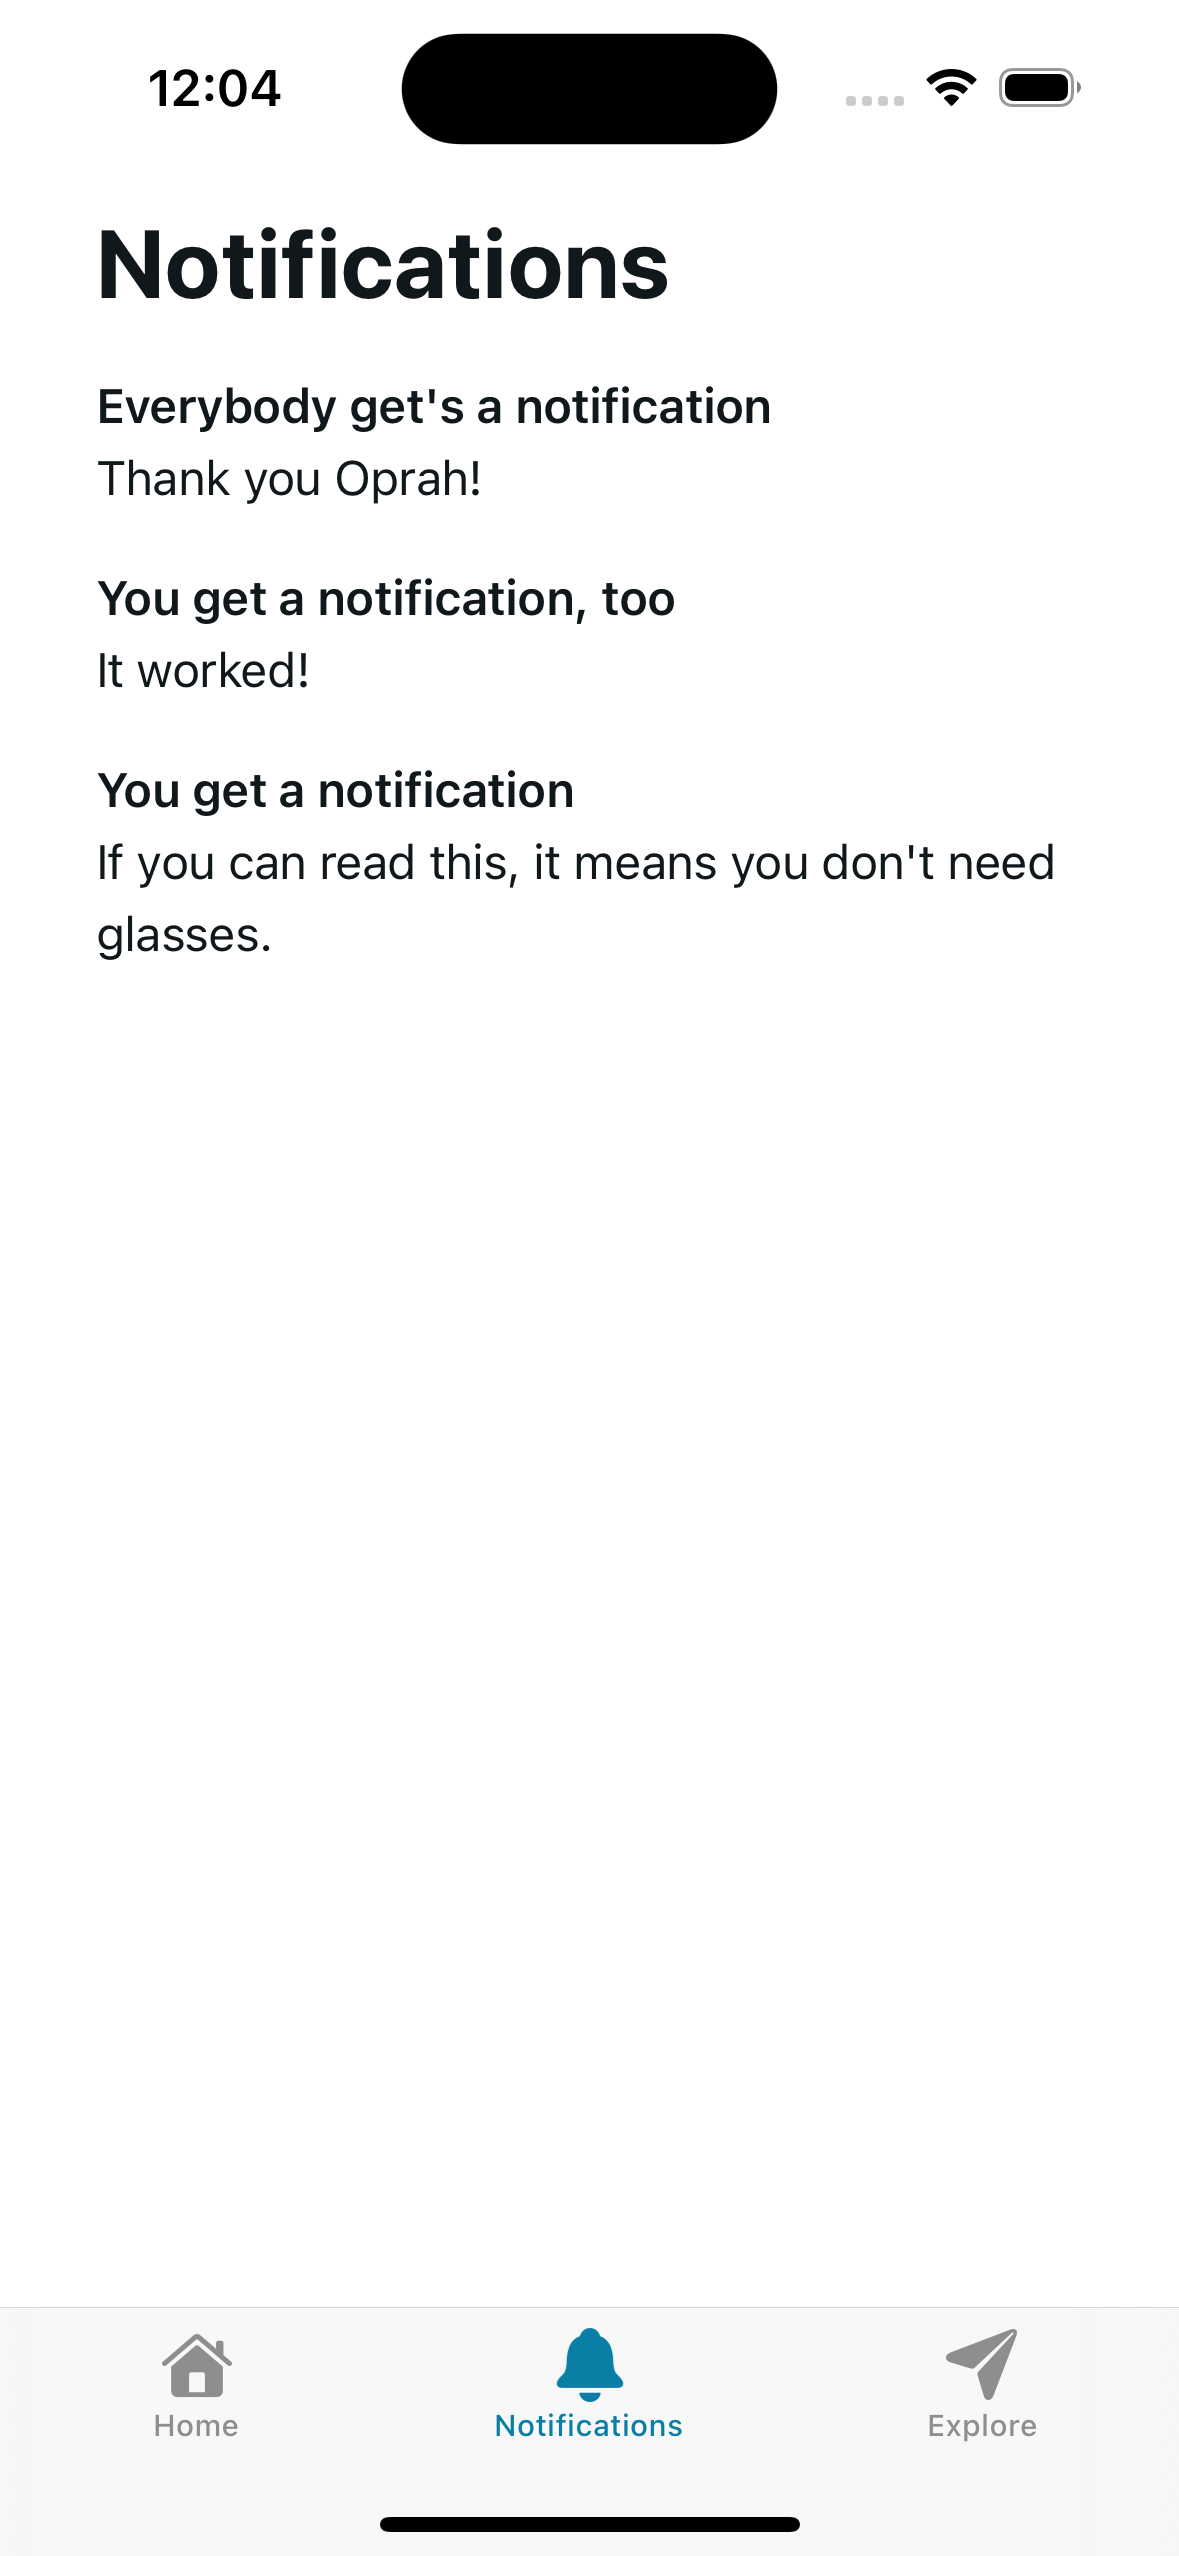
This adds the most basic version of a notification screen. It might not look like much, but that is because MagicBell does a lot of the heavy lifting in the background. For example, you will see new notifications arrive in real time. We also don’t show seen and read states, but those are synced as well. Feel free to extend the example and play around with the notification Object to build this out further, while this guide continues to look into the topic of push notifications next.
To handle incoming notifications effectively, it is important to set up a notification listener. This allows you to log notification events when they are received, especially when the application is in the foreground.
Push Notifications via APNs
MagicBell supports a wide variety of channels over which notifications can be delivered. The two most interesting for a React Native app are APNs for sending push notifications to Apple devices, and FCM for sending push notifications to Android. This section focuses on all the steps that are needed to set up APNs. We'll refer to the appendix for specifics around the FCM setup, but it works quite analogously to APNs and is even simpler in some regards.
Code-signing your app
In order to build and sign our project locally, we are going to use Continuous Native Generation. We can set this up in a few easy steps:
- Add the native iOS and Android directories to git ignore. They will be regenerated using expo prebuild regularly: echo /ios >> .gitignore && echo /android >> .gitignore
- Update app.json to contain information about your native build. You will want to use custom values here that match your developer account setup, like your own Apple Team ID
 "ios": {
+      "bundleIdentifier": "com.magicbell.inboxexample",
+      "appleTeamId": "7847W99F5L",
       "supportsTablet": true
     },
     "android": {
+      "package": "com.magicbell.inboxexample",
       "adaptiveIcon": {
         "foregroundImage": "./assets/images/adaptive-icon.png",
         "backgroundColor": "#ffffff"
       }
     },
- Prepare a native build using npx expo prebuild
Using this setup, we will only need to update the information in app.json and rerun npx expo prebuild after changing it. This will generate the ios and android folders, overriding any manual changes to them.
Now you can run a local build of your app using npm run ios -- --device. Xcode will take care of creating code signing certificates and registering your bundle identifier in your Apple development team, assuming you've authenticated Xcode with your developer account before.
Adding expo-notifications and registering push tokens
In this guide, we’re using the awesome Expo SDK libraries, which include expo-notifications. You are generally free to choose from the variety of notification SDKs that are available for React Native, as long as it provides a way to register device tokens. Additionally, using expo constants is crucial for retrieving project-specific settings, such as the projectId, which is essential for associating the Expo push token with the correct project.
- Run npx expo install expo-notifications react-native-push-info to add the library and our push-info helper.
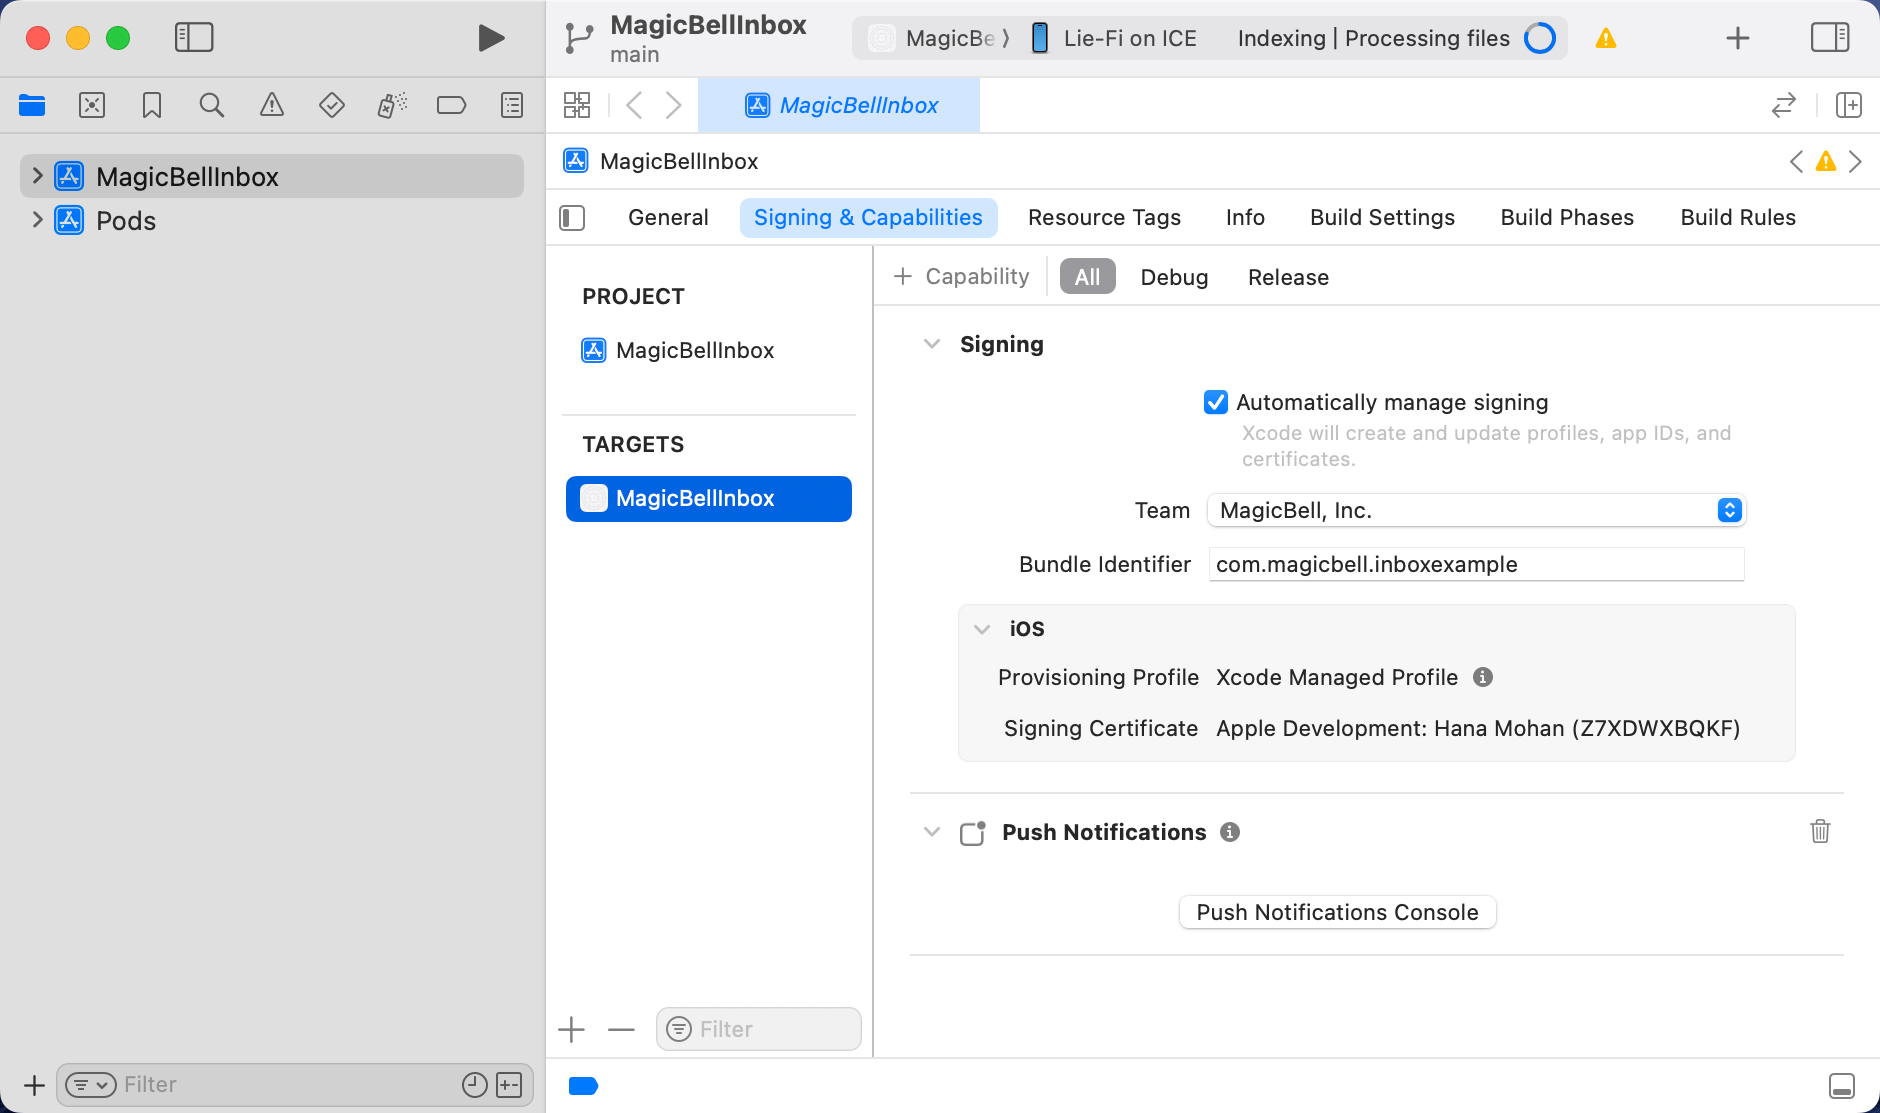
- Rerun npx expo prebuild to regenerate the native projects after adding the library. This also adds the Push notifications capability to our Xcode project.
This is what our project in Xcode looks like now.
With the notification library in place, we can register the device token with MagicBell, so that push notifications can be routed to your device. For this guide, we can use a simple component to post the push token to MagicBell. It is important that it is added as a child inside the MagicBellProvider component tree. Using expo device is also important to check the device type and ensure that push notifications are correctly handled based on whether the app is running on a physical device or a simulator.
So let’s add this component first by creating a new file components/DeviceTokenHandler.tsx:
import { DevicePushToken, getDevicePushTokenAsync, requestPermissionsAsync } from 'expo-notifications';
import { useState, useEffect } from 'react';

import { Platform } from 'react-native';
import * as RNPushInfo from 'react-native-push-info';
import * as mb from '@magicbell/react-headless';

const tokenPath = Platform.select({
  ios: '/channels/mobile_push/apns/tokens',
  android: '/channels/mobile_push/fcm/tokens',
})!;

const apnsTokenPayload = (token: string) => ({
  apns: {
    device_token: token,
    installation_id: RNPushInfo.getIOSAPNSEnvironment(),
    app_id: RNPushInfo.getIOSBundleId(),
  },
});

const fcmTokenPayload = (token: string) => ({
  fcm: { device_token: token },
});

export function DeviceTokenHandler() {
  const [token, setToken] = useState<DevicePushToken | null>(null);

  useEffect(() => {
    requestPermissionsAsync()
      .then(() => getDevicePushTokenAsync())
      .then((deviceToken) => setToken(deviceToken));
  }, []);

  const { type, data } = token || {};
  useEffect(() => {
    if (!type || !data) {
      return;
    }
    const payload = type === 'ios' ? apnsTokenPayload(data) : fcmTokenPayload(data);

    mb.postAPI(tokenPath, payload);
  }, [type, data]);

  return null; // render nothing
}
The async function registerForPushNotificationsAsync is used here to request user permissions and obtain the Expo push token, which is necessary for sending notifications to the user's mobile device.
If we step through the code of DeviceTokenHandler, we can see what is happening:
- When the component is loaded, we request push permissions via requestPermissionsAsync() and then get the device token via getDevicePushTokenAsync().
- When that token arrives, we trigger a post request via mb.postAPI(…) that stores the token for the current user on MagicBell.
Next, we are going to add it to the component tree inside app/_layout.tsx, making sure it’s under the MagicBellProvider, so the mb.postAPI(…) call runs in the context of an authenticated user.
return (
  <MagicBellProvider apiKey="[API-KEY]" userEmail="[USER-EMAIL]">
    + <DeviceTokenHandler />
    <ThemeProvider value={colorScheme === 'dark' ? DarkTheme : DefaultTheme}>
      <Stack>
        <Stack.Screen name="(tabs)" options={{ headerShown: false }} />
        <Stack.Screen name="+not-found" />
      </Stack>
      <StatusBar style="auto" />
    </ThemeProvider>
  </MagicBellProvider>
);
Best Practices for token registration
This guide provides a simplified version of the token registration logic. A more elaborate version can be found in this Gist. Either way, when implementing your own logic there are a few best practices to adhere to. In short:
- Make sure to unregister the tokens when the user signs out / their session expires, to prevent unwanted deliveries. To do that, send a DELETE request to tokenPath + "/" + token.
- Re-registering the same token multiple times does no harm, so don't optimize around that, but instead makes sure we're always aware of the most recent device token a device is issuing.
Configuring the MagicBell APNs integration
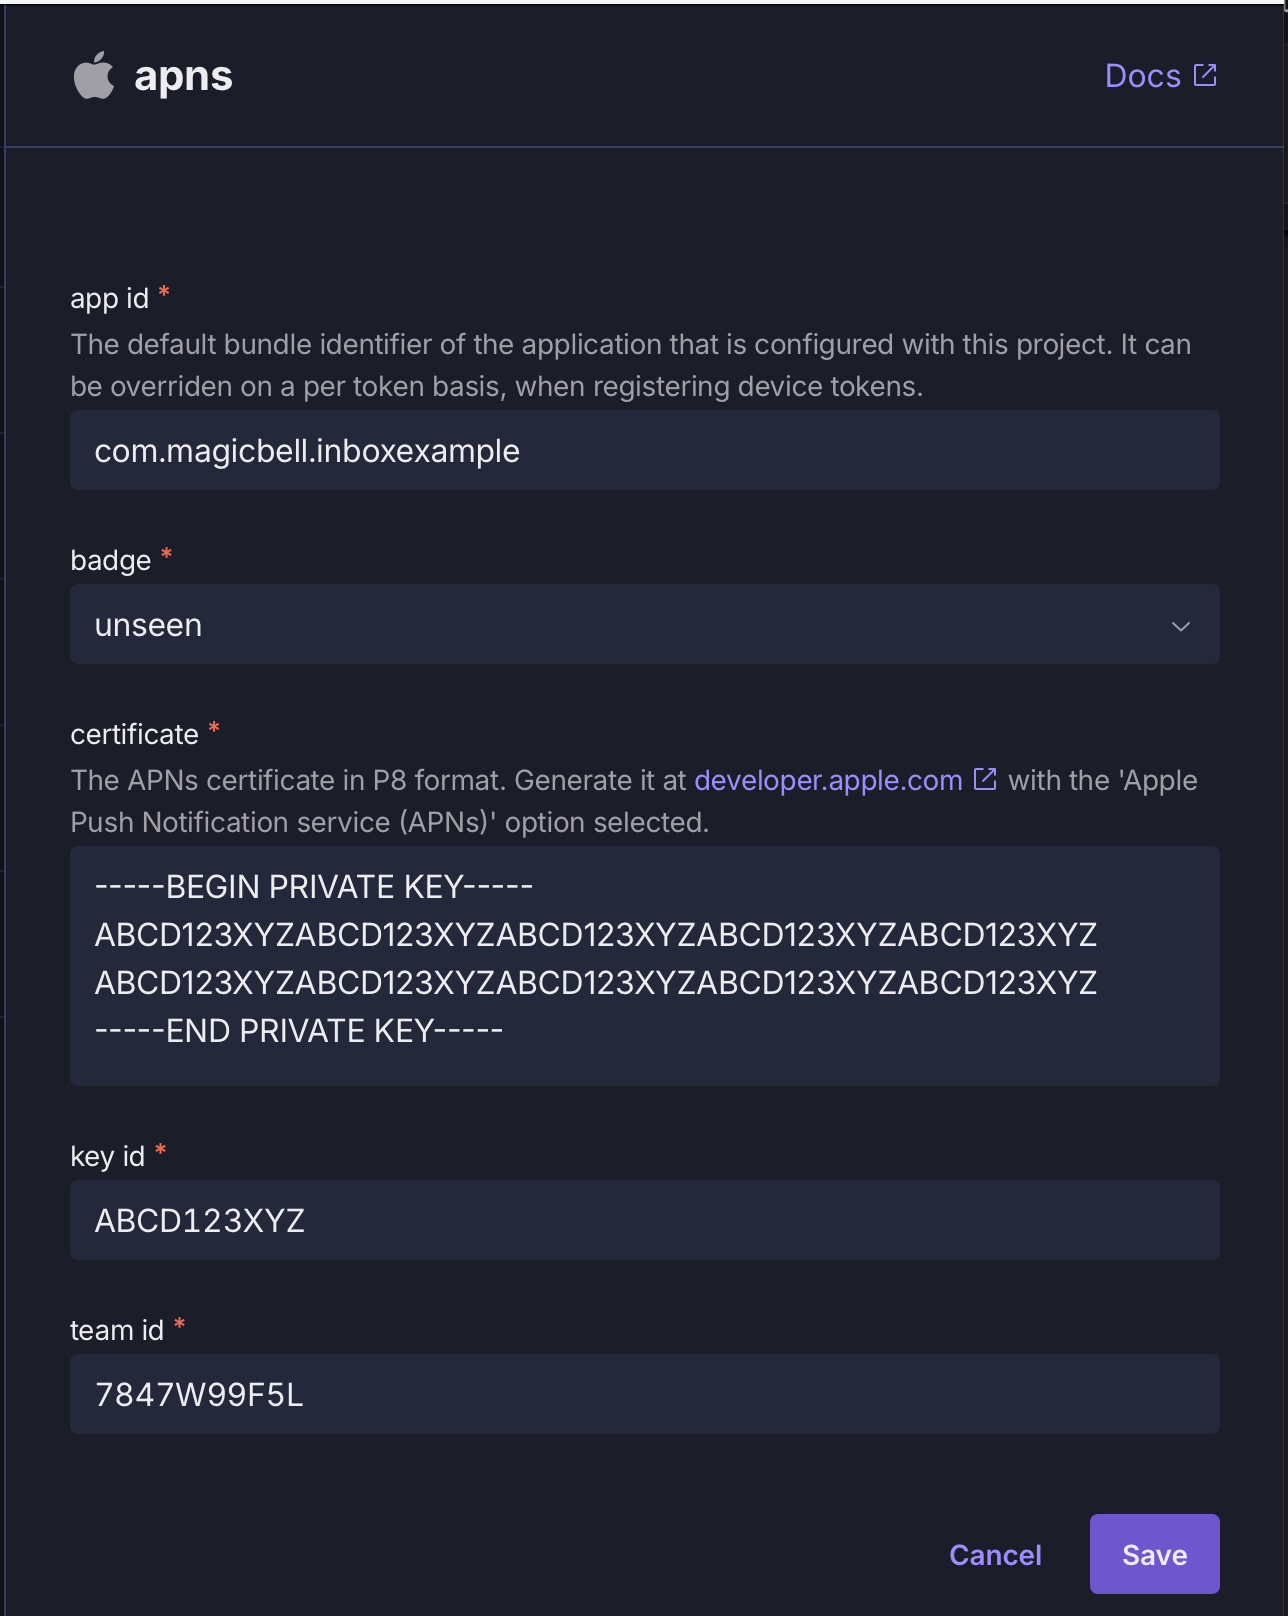
With the device token in place, we have the address of the device to which we'll deliver push notifications. Next, we need to set up the communication channel between MagicBell and the APNs service that performs the actual push notification delivery.
For this we will need the following information:
-
The Bundle ID and Apple Team ID that you've used before while setting up code-signing (see your app.json file).
-
A key (aka certificate) with enabled APNs capability. You'll need the .p8 file that you can download after creating the key, and the identifier of the key. Here's how you can create one:
- Head over to "Certificates, Identifiers & Profiles" on Apples Developer Portal and create a new key. Choose a name and description that makes sense for you.
- Notice 1: You can only download the .p8 file once, right after creating the key. Make sure to store it in a safe place.
- Notice 2: You can have a maximum of two APNs keys. A first one you can use with MagicBell and/or other services, and a second one that comes in handy in case you need to rotate the keys in the future.
With the necessary information at hand, head over to your MagicBell project settings page and select the "integrations" section. Add a new integration and select APNs. You should have all the information ready that you need to fill in the form. The content of the .p8 file can be pasted into the text area. Here's an example to guide you:
Show Time!
Thanks for sticking with us all the way to the end. Let’s bring it all together, shall we?
- Start the app for iOS: npm run ios
- Send a broadcast via the CLI: magicbell broadcasts create –recipients [USER-EMAIL] –title “Good things” –content “come to those that put in the work”
To ensure everything is working correctly, you can send a test notification using the Expo notification tool. Configure the settings for test notifications and follow the steps to send and view notifications on your device, even when the app is in the background.
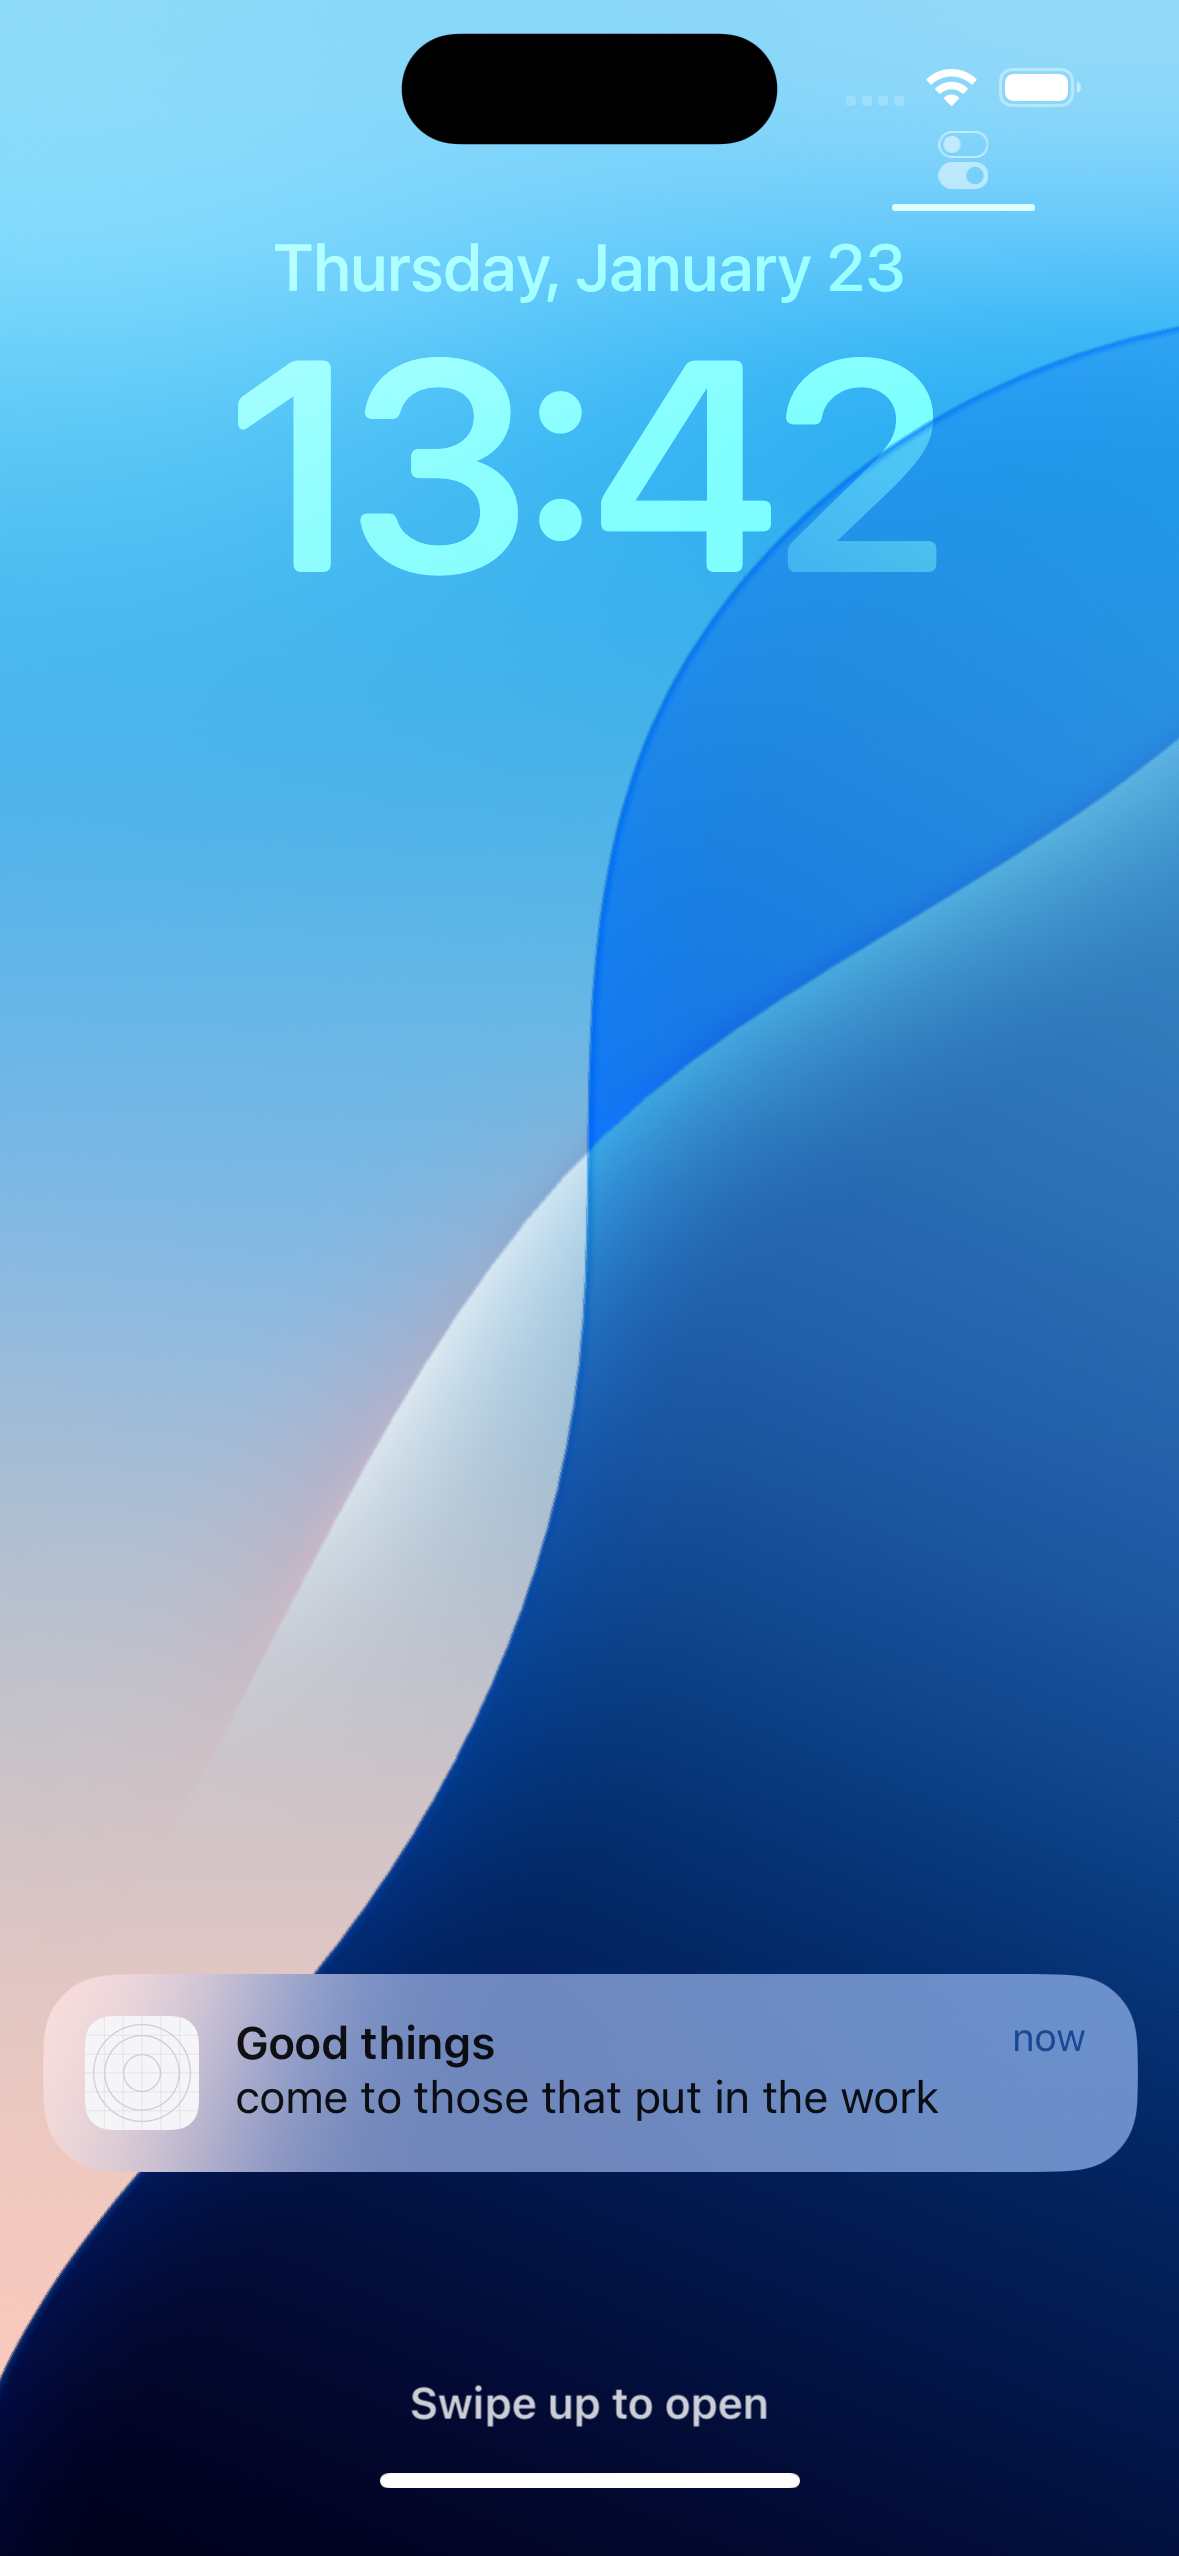
Congratulations, you’ve now setup your application to receive push notifications, and your MagicBell project to send them.
Your application is ready to receive notifications in local development (Device and Simulator), being distributed via TestFlight or even submitted to the AppStore 🎉.
Sending a Push Notification
To send a push notification, you need to use a server-side platform such as Firebase Cloud Messaging or OneSignal. The process of sending a push notification involves several steps, including registering for push notifications, obtaining a push token, and sending the notification using the push token. The push token is a unique identifier that is used to send notifications to the app.
You can use the ``` expo-notifications
useEffect(() => {
  const notificationListener = addNotificationReceivedListener((notification) => {
    alert(notification.request.content.title);
  });

  const responseListener = addNotificationResponseReceivedListener((response) => {
    alert(response.notification.request.content.title);
  });

  return () => {
    removeNotificationSubscription(notificationListener);
    removeNotificationSubscription(responseListener);
  };
}, []);
function to send the notification to the user’s device. The sendPushNotificationfunction takes the notification object as an argument and sends the notification to the user’s device using the push token. You can also use the expo-push-token to send notifications to the app using the Expo Push API.
For example, you can use the following code snippet to send a push notification:
import { sendPushNotification } from 'expo-notifications';

const message = {
  to: 'ExpoPushToken',
  sound: 'default',
  title: 'Original Title',
  body: 'And here is the message!',
  data: { test: 'test' },
};

sendPushNotification(message);
This code snippet sends a push notification to the user’s device with the title “Original Title” and the message “And here is the message!”. The sendPushNotification function is used to send the notification to the user’s device using the push token. You can customize the notification object to include other relevant details such as the notification content, notification button, and more.
You can also use the useEffect hook to handle notifications in your React Native app. For example, you can use the following code snippet to handle notifications:
import { useEffect } from 'react';
import { Notifications } from 'expo-notifications';

useEffect(() => {
  const subscription = Notifications.addNotificationReceivedListener((notification) => {
    console.log(notification);
  });

  return () => {
    subscription.remove();
  };
}, []);
This code snippet adds a listener to handle notifications when the component mounts. The listener is removed when the component unmounts. You can customize the listener to handle notifications in different ways, such as displaying the notification content or performing other actions.
In summary, sending a push notification involves several steps, including registering for push notifications, obtaining a push token, and sending the notification using the push token. You can use the expo-notifications library to handle push notifications in your React Native app, and customize the notification object to include other relevant details. You can also use the useEffect hook to handle notifications in your React Native app.
Bonus: Opening a Push Notification
Opening a push notification is not complicated as well. This differs depending on the push notification library that's been used. In the case of expo-notifications it is as simple as adding the following code effect as an entry point:
useEffect(() => {
    const notificationListener = addNotificationReceivedListener(notification => {
      alert(notification.request.content.title);
    });

    const responseListener = addNotificationResponseReceivedListener(response => {
      alert(response.notification.request.content.title);
    });

    return () => {
      removeNotificationSubscription(notificationListener);
      removeNotificationSubscription(responseListener);
    };
  }, []);
There are some caveats to this, i.e. wether the app is running in the foreground, or in the background when the notification arrives. Also be aware that the structure of the notification is different, depending on wether your app is running on iOS or Android. For more details, please refer to the documentation.
Appendix
Securing users via HMAC validation
-
HMAC security
echo -n "[email-address]" | openssl dgst -sha256 -hmac "[secret-key]" -binary | base64
Android setup
The guide focused on setting up APNs and iOS, we do love Android as well though and want to help you get stared with FCM as well. The concepts are very much the same, and are abstracted in similar ways. We’re providing details on the Android specifics here though, to rule out any uncertainty.
Prerequisites for Android development
In order to build the app locally your will need to have Android Studio set up. Also you will need a Firebase account to register your app with FCM, which we’ll get to next.
Setting up FCM
Sign in to the FCM console and create a new project. In the project settings you can add a new Android app, using the package ID you provided in your app.json earlier. Download the google-services.json file and put it in your projects root folder. Next, update the app.json file again, to reference it, just like so:
     "android": {
       "package": "com.magicbell.inboxexample",
+      "googleServicesFile": "./google-services.json",
       "adaptiveIcon": {
         "foregroundImage": "./assets/images/adaptive-icon.png",
         "backgroundColor": "#ffffff"
       }
     },
It's important to set up FCM and APNs credentials for successfully delivering push notifications. These credentials are essential for interacting with notification gateways like Firebase Cloud Messaging and the Apple Push Notification service, ensuring that push notifications can be sent and received properly.
Once that is done, you can regenerate the native Android parts of your project by running npx expo prebuild.
Setting up MagicBell FCM integration
To configure the FCM integration you need a FCM service account first. Head over to the service accounts settings in the FCM console and press “Generate new private key”. This will result in downloading a JSON file with all the information that is required to setup the FCM integration.
Head back to the MagicBell integration settings, add a new FCM integration, and add all the info you should find in the JSON file.
Is the FCM API deprecated?
Regarding Firebase Cloud Messaging (FCM), only the legacy Cloud Messaging API has been deprecated. We use the current Firebase Cloud Messaging API (V1). The messaging is a bit confusing, because both APIs have a similar name. The legacy API has been discontinued already in July 2024 on though.
More info on https://firebase.google.com/support/faq#deprecated-api-shutdown