Billions of people around the globe interact with their smartphones multiple times a day. In fact, there are more than 4.8 billion smartphone users around the world as of January 2025, and many of them rarely go anywhere without their phones.
Today, it’s essential for all kinds of businesses to have a strategy to reach users via their smartphones. Given the massive volume of smartphone users who spend multiple hours each day on their devices, businesses that can garner the most attention from users have a competitive advantage.
There are several ways to reach users via mobile, including:
- SMS
- Voice calls
- Messenger
- Telegram
- Other social media
- Push notifications
Push notifications, in particular, are an effective means to engage users and boost user retention.
The two most popular smartphone platforms are iOS and Android. Android has more than 3.5 billion active users, which is around 75% market share among smartphone users. Developing and executing a strategy to engage this large user base with push notifications is a must. While this guide focuses on Android, developers working across both platforms should also familiarize themselves with implementing push notifications for iOS and Android apps, as each platform has unique requirements and capabilities.
Android Push Notifications: What Are They?
The mobile operating system Android manages push notifications from different applications. These notifications appear in the notification center and prompt the user to take a specific action. Android notifications generally have a thumbnail image, a title, some text and one or more prompts to elicit user actions. Each notification can have its own alert style, sound, and vibration styles. Users can configure their preferences in their notification center settings.
There are two primary types of Android push notifications:
- Default: These are the simplest types of Android push notifications. Such notifications can have a thumbnail and some text. Clicking on the notification will directly launch the relevant page of the Android application.
- Interactive: Interactive notifications have buttons within the notification, which users can interact with without launching the Android application. For example, the music player will have a notification with play/pause, next, and previous buttons. Users can interact with those buttons to perform certain actions without launching the music player.
Depending on the content in the notifications, Android push notifications can also be classified into utility notifications, update notifications, and promotional notifications. Depending on the category, the Android operating system has the power to limit the reach of your notifications.
How Does an Android Push Notification Work?
In order to send push notifications to an Android user, they must have your Android application installed. The user also has to opt-in to receive push notifications from your applications. Once these two fundamental requirements are in place, you will be able to send push notifications to Android users.
Three components have to be in place to send push notifications to Android users:
- Client application: The client application is your Android application that the user has installed on their Android smartphone. The user should also have opted-in to receive push notifications. Only then will you be able to send push notifications to the user.
- Server application: The server application refers to the place where the logic of your notifications resides. Some push notifications are generated by the client application, while others are pushed from a remote server to the client application. The code logic that pushes notifications is termed a server application.
- Firebase Cloud Messaging: An operating system push notification service (OSPNS) is required to forward the push notification from the server application to the client application. Firebase Cloud Messaging (FCM) is the OSPNS for Android push notifications. See our FCM tutorial for implementation details.
When users opt-in for push notifications from your Android application, a device token is generated. This is used to identify users in the application. When you want to push a new message, you have to pass the content and device token to FCM. FCM connects the right client application and push out the notification.
You can also use an SDK to automate many elements of creating and tracking push notifications. For example, MagicBell SDKs and API wrappers can be used to build an effective notification system for web and mobile applications.
Building an Android Push Notification System
Now that you understand the basic concept of Android push notifications, the next step is to build the system. You'll need a few things in place before getting started:
- The latest version of Android Studio.
- A project targeting Android Jelly Bean or later (API level 16+).
- Gradle 4.1 or later.
- Android X with com.android.tools.build:gradle v3.2.1 or later and compileSdkVersion 28 or later.
- A Google account to sign in to Firebase.
Create a Firebase Project
Use the Firebase console to create a new project by clicking the "Add project" button.
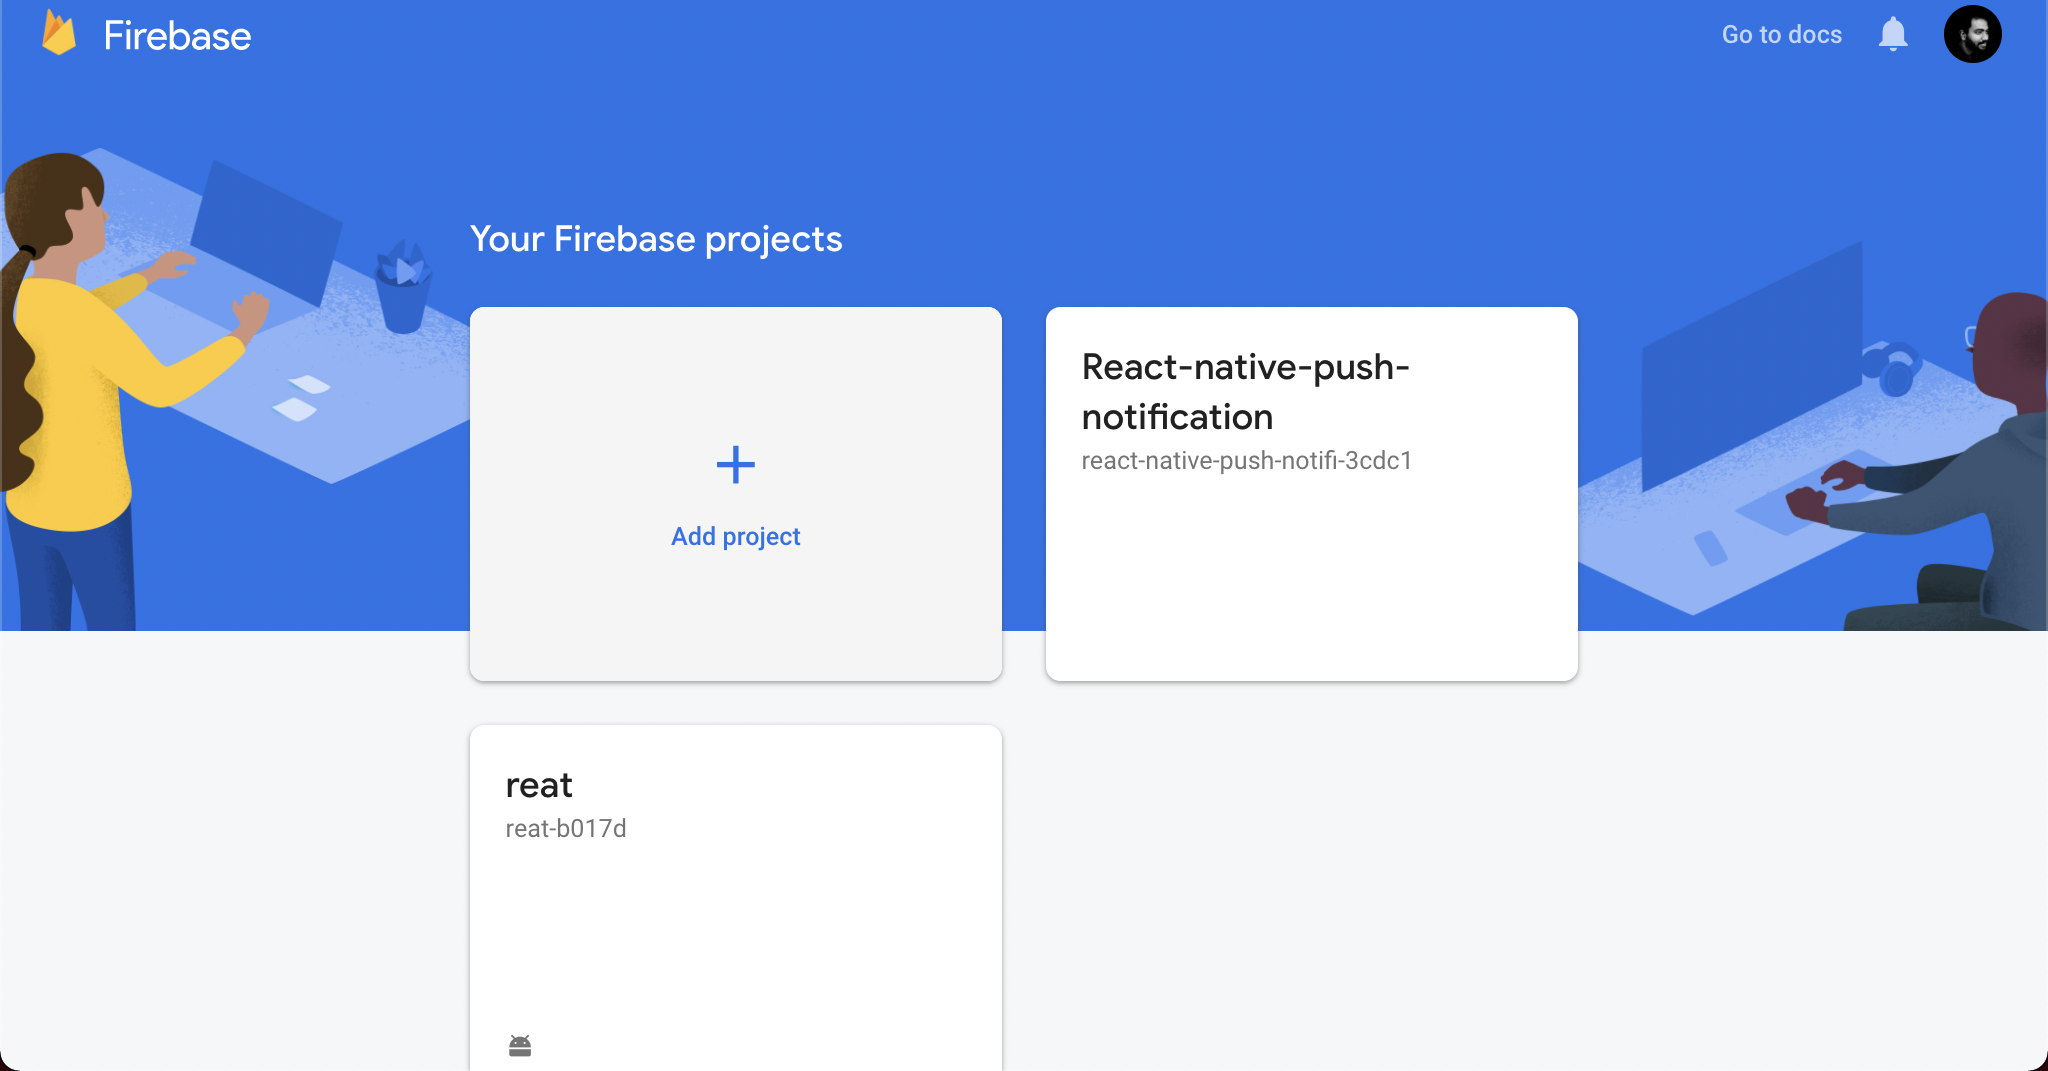
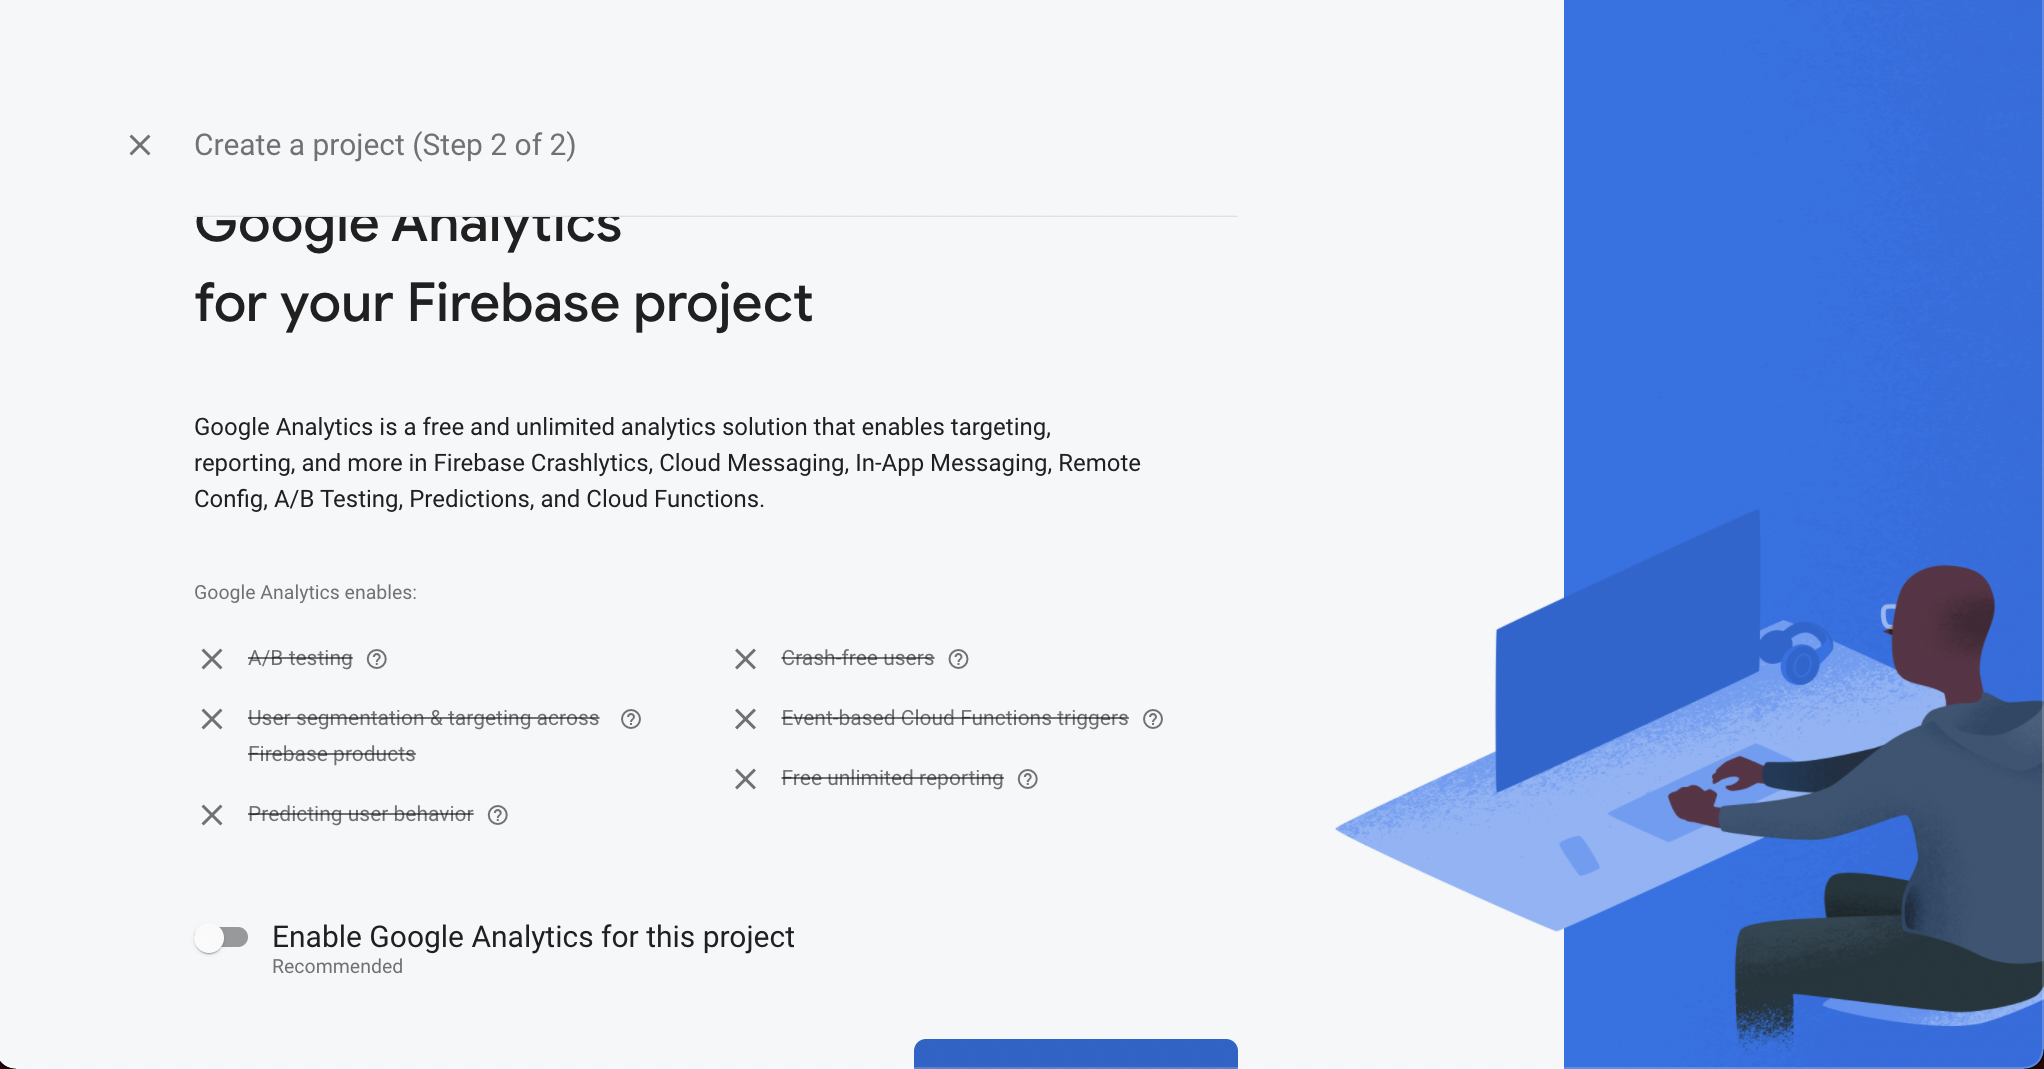
Enter a name for the project and hit "Continue." In the next step, you can choose whether to link the project with Google Analytics. Once you've made your decision, click "Create project."
The console will set up the project in a few seconds. From the project dashboard, click the Android icon to add your Android app.
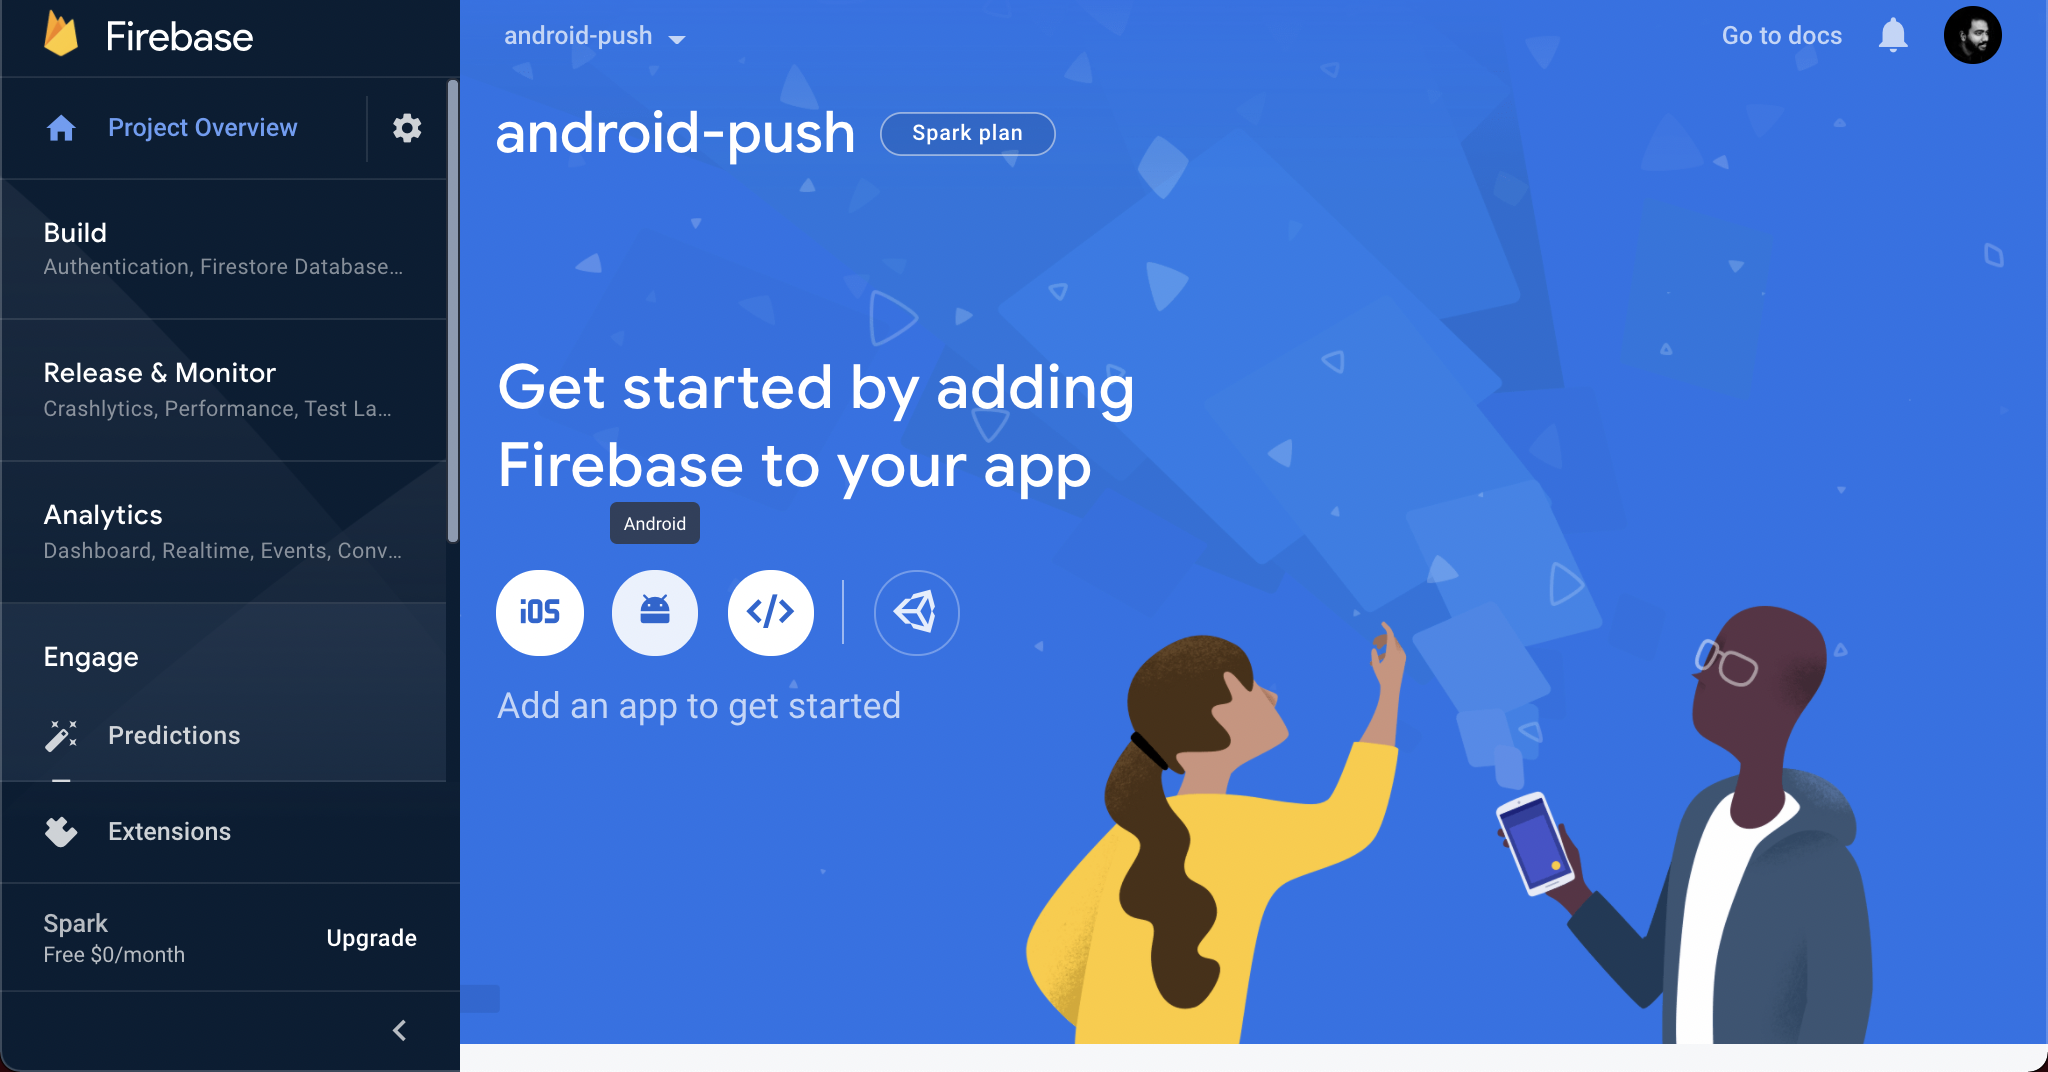
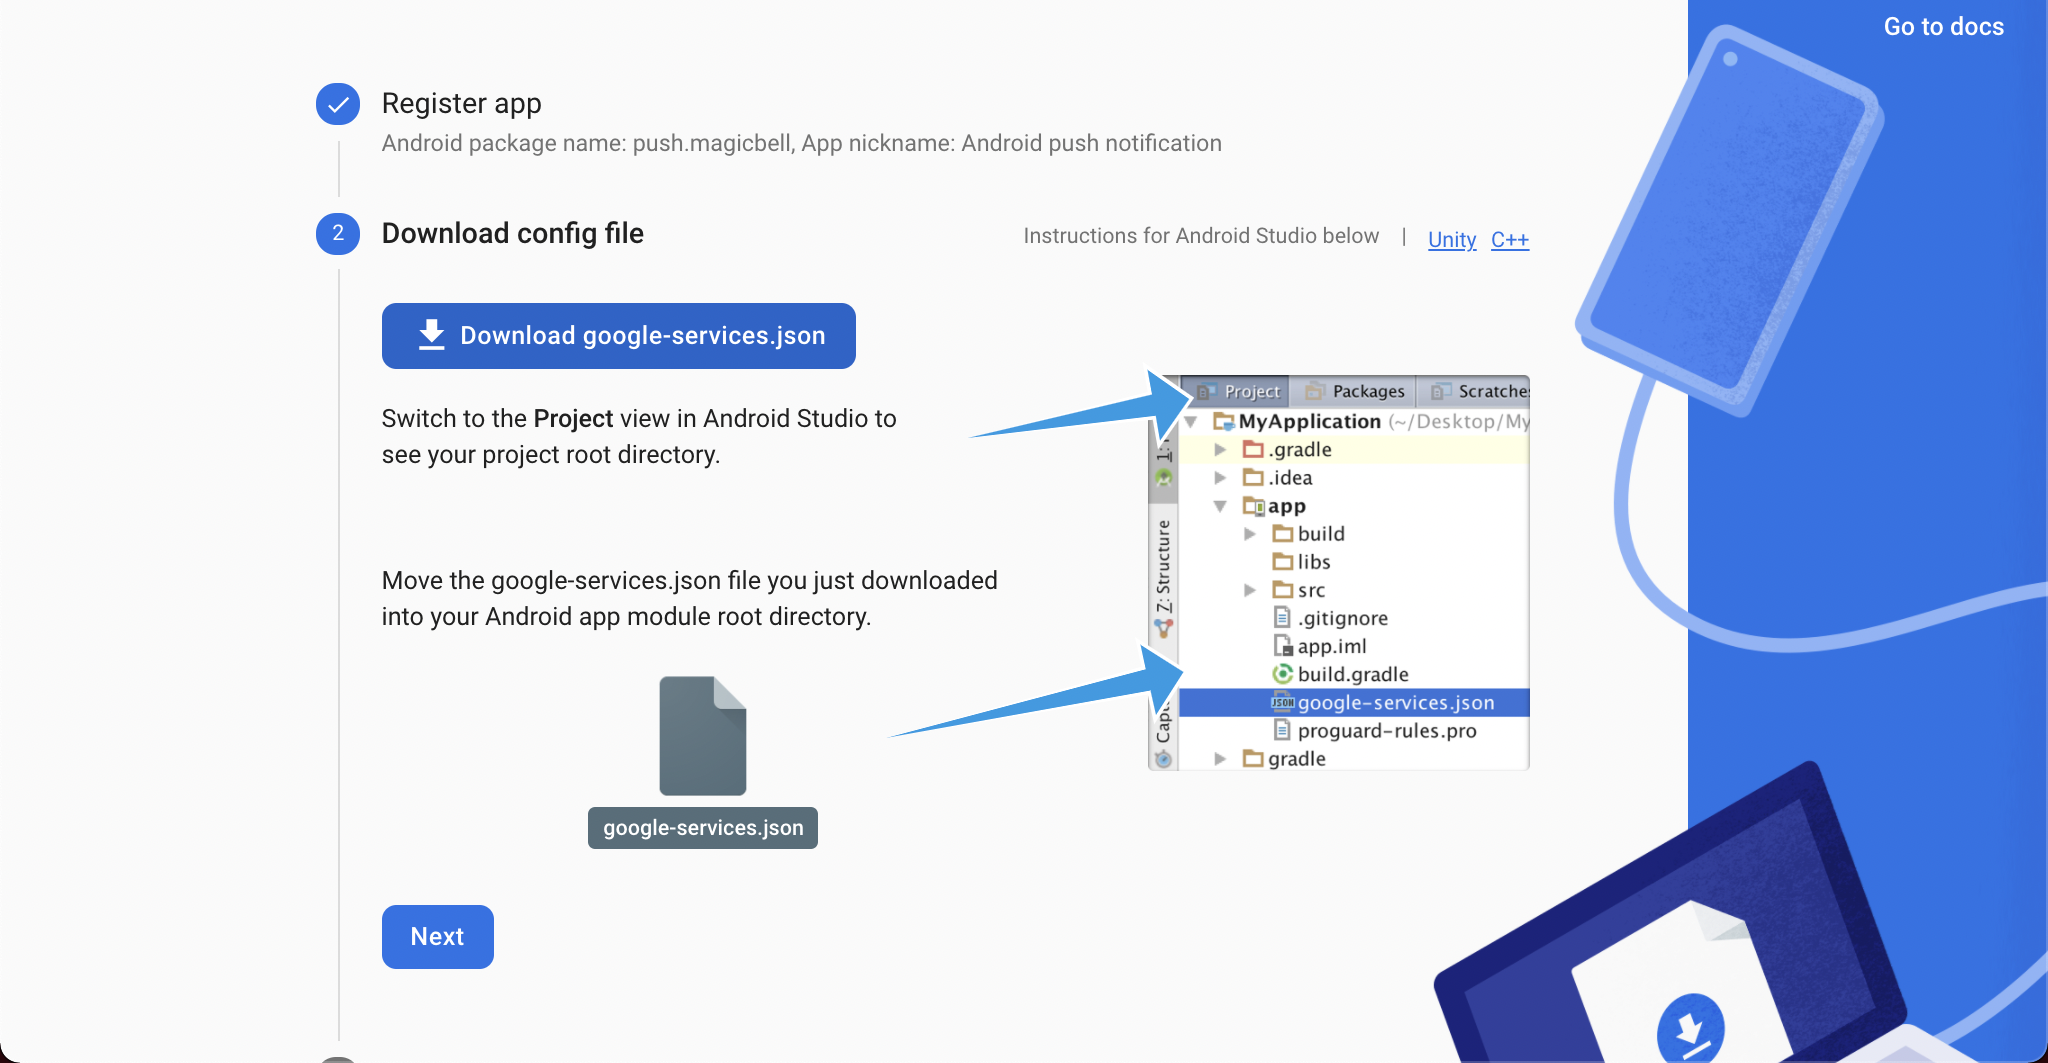
Register the app by entering your package name (the applicationId in your app-level build.gradle file). The other fields are optional. Then click "Register app" and download the google-services.json config file. Move it into your Android app module root directory.
Add the Firebase SDK
Make sure you have Google's Maven repository. Add the following to the project-level build.gradle (<project>/build.gradle):
buildscript {
repositories {
// Check that you have the following line (if not, add it):
google()  // Google's Maven repository
}
dependencies {
...
// Add this line
classpath 'com.google.gms:google-services:4.3.8'
}
}
allprojects {
...
repositories {
// Check that you have the following line (if not, add it):
google()  // Google's Maven repository
...
}
}
Then add the following to the app-level build.gradle (<project>/<app-module>/build.gradle):
dependencies {
// ...
// Import the Firebase BoM
implementation platform('com.google.firebase:firebase-bom:28.3.0')
// When using the BoM, you don't specify versions in Firebase library dependencies
// Declare the dependency for the Firebase SDK for Google Analytics
implementation 'com.google.firebase:firebase-analytics'
// Declare the dependencies for any other desired Firebase products
implementation 'com.google.firebase:firebase-auth'
implementation 'com.google.firebase:firebase-firestore'
}
Sync the gradle changes in the IDE.
Edit the App Manifest
Edit the app manifest (AndroidManifest.xml) to add message handling capabilities beyond receiving notifications in the background. This allows you to receive notifications in foregrounded apps, receive data payloads, and send upstream messages. The following code extends FirebaseMessagingService:
<service android:name=".java.MyFirebaseMessagingService" android:exported="false">
  <intent-filter>
    <action android:name="com.google.firebase.MESSAGING_EVENT" />
  </intent-filter>
</service>
Handle Device Registration Tokens
When a user installs an app for the first time, the Firebase SDK generates a registration token used to target each device. To retrieve the current token, use:
FirebaseMessaging.getInstance().getToken();
Firebase Cloud Messaging also provides functionalities to monitor token generation and prevent auto-initialization. You can use device registration tokens to create segmented device groups for targeted messaging.
Send Your First Notification
Firebase provides options to compose notification messages directly from the console. Under the "Engage" tab, click on Cloud Messaging. Make sure the app is installed and running on the target Android device.
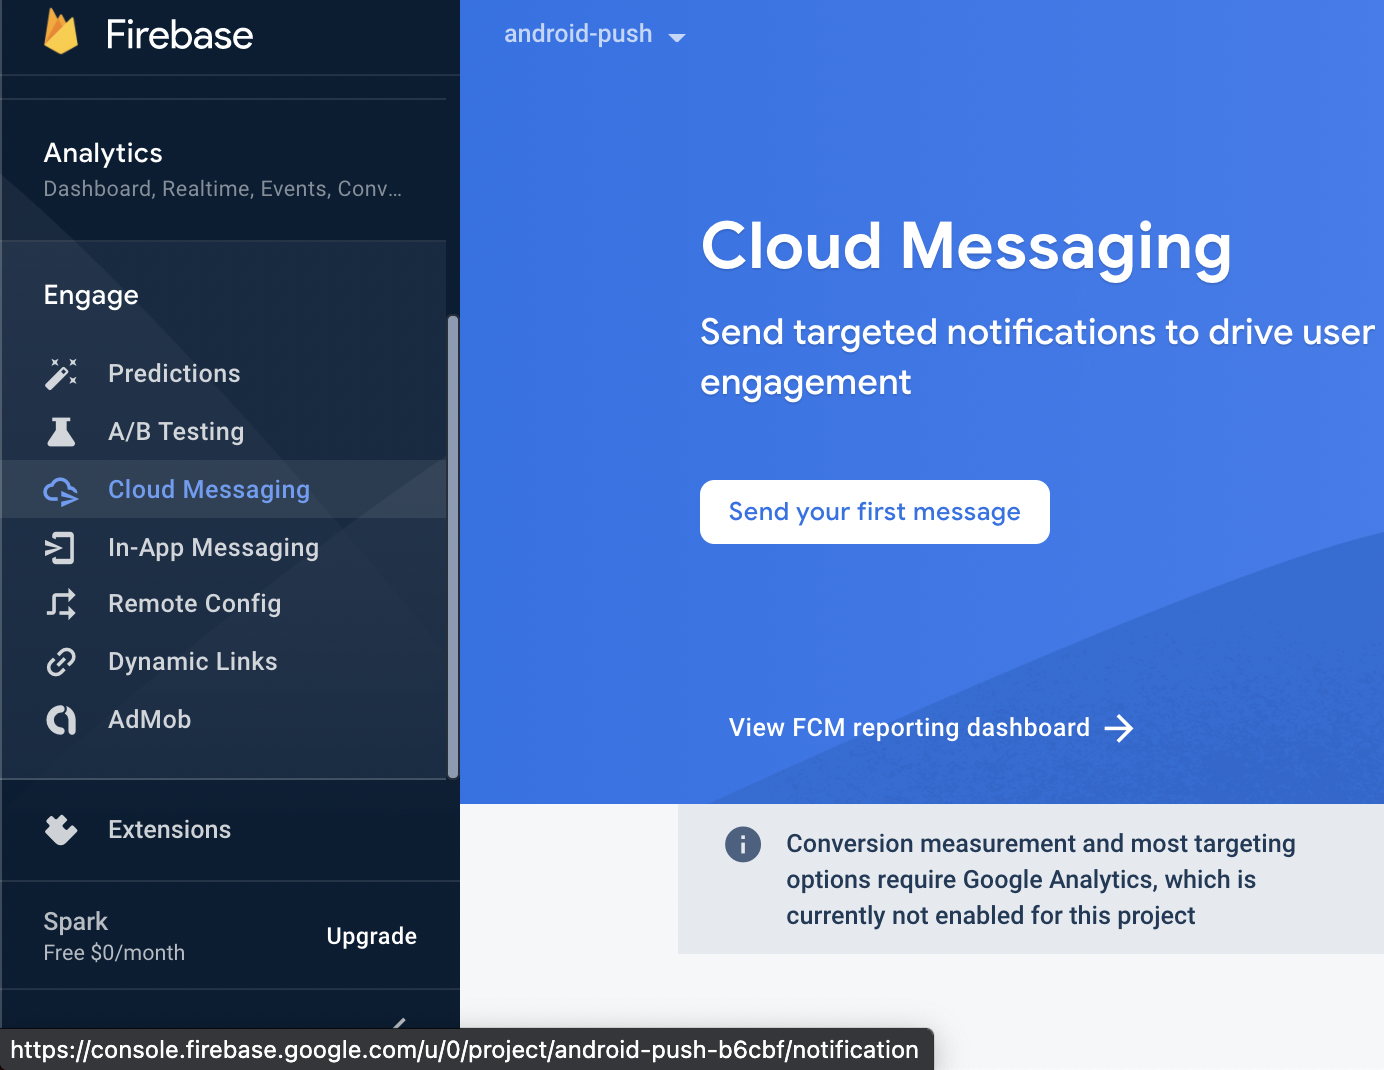
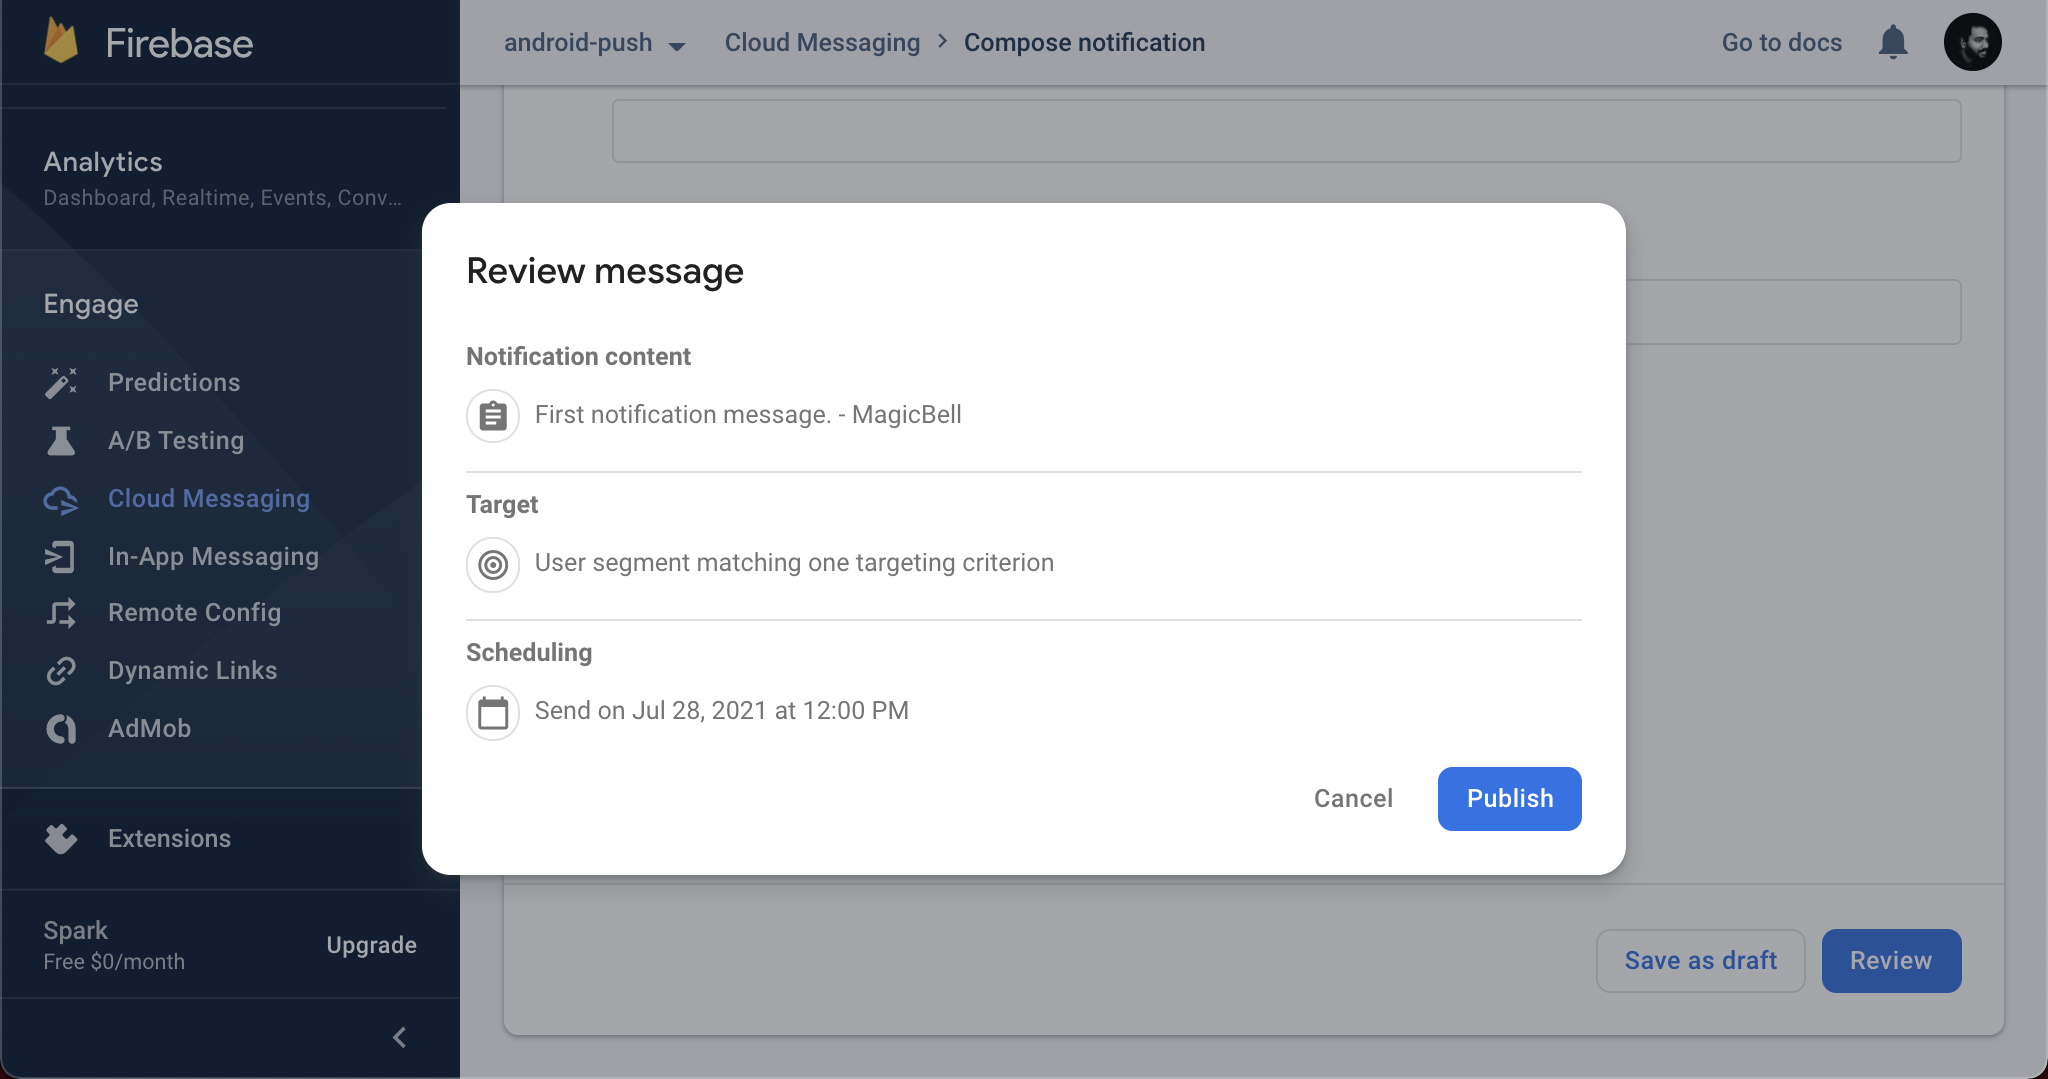
Click "Send your first message." Enter an optional title and the message content. You can also add a notification image to display on the notification screen. The right side of the console shows a preview for Android devices.

Set your targeting options and schedule the date and time. You can also provide additional data such as the Android notification channel, notification sound, and expiry. Once everything is set up, review your settings and click "Publish" to send the notification.
There are many more push notification functionalities in Firebase. These are explained in detail in the Firebase documentation. For a complete guide to sending notifications across web and mobile platforms, see our Firebase push notifications guide.
Once you have set up a complete Android push notification system, you can build a unified inbox to collate all the push notifications you send to users. When evaluating push notification software options, MagicBell's notification inbox is a comprehensive solution that you can have up and running in under an hour.